Network Booting a Raspberry Pi 3 from an Ubuntu Server

Introduction
I often use Raspberry Pis as Chromium Kiosk Clients to monitor our systems and infrastructure, and to reduce the overheads I also Network Boot them for this and a few other uses (hopefully coming soon) so that they are easy to manage collectively without needing to flash numerous SD cards, and additionally removing need to worry abou the life of SD cards after many write operations.
This article is initially based on the following guides, but looks to includes a bit more detail and troubleshooting steps:
It is also possible to Network Boot a Raspberry Pi 2.
Setup
The Server
A HP Micro Server (G7 N54L) running Ubuntu 16.04.3 LTS (doing various other things too)
The Client(s)
Raspberry Pi 3 Model B (connected via Wired Ethernet, this process does not work over WiFi)
The Target OS
Raspbian 9 Lite (non Lite should work too)
Preparing the Root Filesystem to Boot
In this set of steps we will copy a new Raspbian install, with a few tweaks to our boot server and expose it over an NFS share.
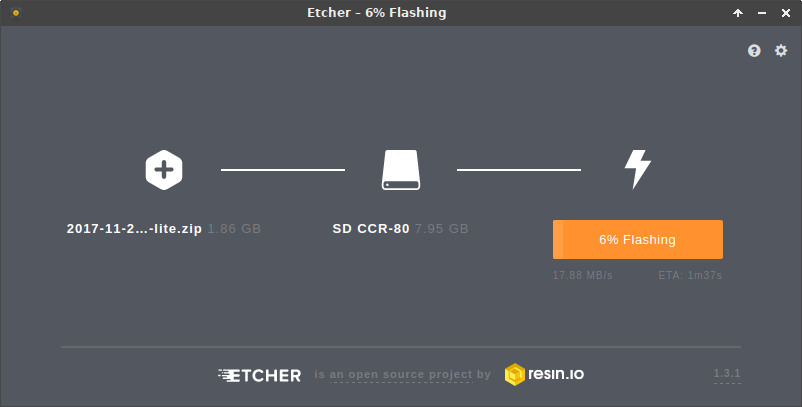
Step 1: Raspbian Lite SD Card
Download the Raspbian Lite Image from here.
Flash to a Micro SD card, the easiest way is to use Etcher (it will even take a zip directly and also verifies the content after).
Step 2: Boot the Raspberry Pi from the new SD Card
Note: This will need a screen, keyboard, and Ethernet cable (with internet access) connected.
Once the Pi boots login with the default credentials (pi / raspberry).
Step3: Enable SSH (Optional)
Run sudo raspi-config, selection Option 5 (Interfacing Options), P2 (SSH) and select Yes to Enable SSH.
You can then quit this utility and continue the following steps via SSH if preferred, or continue locally.
The IP is printed on boot but can also be viewed by running ip addr:
pi@raspberrypi:~ $ ip addr
1: lo: <LOOPBACK,UP,LOWER_UP> mtu 65536 qdisc noqueue state UNKNOWN group default qlen 1
    link/loopback 00:00:00:00:00:00 brd 00:00:00:00:00:00
    inet 127.0.0.1/8 scope host lo
       valid_lft forever preferred_lft forever
    inet6 ::1/128 scope host
       valid_lft forever preferred_lft forever
2: eth0: <BROADCAST,MULTICAST,UP,LOWER_UP> mtu 1500 qdisc pfifo_fast state UP group default qlen 1000
    link/ether b8:27:eb:41:8e:fa brd ff:ff:ff:ff:ff:ff
    inet 192.168.1.135/24 brd 192.168.1.255 scope global eth0
       valid_lft forever preferred_lft forever
    inet6 fe80::2036:591:cef2:341a/64 scope link
       valid_lft forever preferred_lft forever
3: wlan0: <NO-CARRIER,BROADCAST,MULTICAST,UP> mtu 1500 qdisc pfifo_fast state DOWN group default qlen 1000
    link/ether b8:27:eb:14:db:af brd ff:ff:ff:ff:ff:ff
In this case our wired interface is eth0, which has the address 192.168.1.135.
Step 4: Update Debian
First, run sudo apt-get update to ensure all package index files are up-to-date.
Then, run sudo apt-get upgrade to install the newest versions of all packages currently installed.
Then, run sudo apt-get dist-upgrade which intelligently handles changing dependencies with new versions of packages.
In both cases when requested, check and confirm you are happy with the changes proposed.
Step 5: Disable Swap
sudo dphys-swapfile swapoff
sudo dphys-swapfile uninstall
sudo update-rc.d dphys-swapfile remove
Step 6: Update the Pi (firmware)
Certain files from the next branch of the rpi-firmware repository are required for this process to work.
This step is probably optional if bootcode.bin is used from GitHub in the TFTP steps below.
Edit: I've also observed using the 'stock' raspbian kernel img files can cause nasty boot errors.
Run sudo BRANCH=next rpi-update.
Edit (2018-07-14): Warning, the next branch appears to be out of date now, updating from master (the default) works fine for 3B+.
Details on rpi-update can be found here https://github.com/Hexxeh/rpi-update.
It is likely to complete by saying:
*** A reboot is needed to activate the new firmware
So, reboot now with sudo reboot.
Step 7: 'Clone' the filesystem
Once the Pi has rebooted, locally or via SSH, run:
sudo mkdir -p /nfs/client1
sudo apt-get install -y rsync
sudo rsync -xa --progress --exclude /nfs / /nfs/client1
Note: You must do this on a running Pi, copying off the SDK card on another host did not appear to work.
Regenerate SSH host keys (arguably optional):
cd /nfs/client1
sudo mount --bind /dev dev
sudo mount --bind /sys sys
sudo mount --bind /proc proc
sudo chroot .
rm /etc/ssh/ssh_host_*
dpkg-reconfigure openssh-server
exit
sudo umount dev
sudo umount sys
sudo umount proc
Remove the duplicated swap file if it exists:
sudo rm /nfs/client1/var/swap
Then create a tar archive of the nfs folder (you could gzip it but as the Pi isn't all that powerful its probably not worth it vs transfer time, but this is just an assumption).
The -p flag should preserve permissions etc.
sudo tar -cpf /nfs.tar /nfs
I ended up with a 1.2Gb tar:
pi@raspberrypi:~ $ ls -alh /nfs.tar
-rw-r--r-- 1 root root 1.2G Mar  2 20:56 /nfs.tar
Finally this archive needs to end up on the Server, how doesn't really matter - rsync, scp, or take the card out and copy it...
eg:
pi@raspberrypi:~ $ scp /nfs.tar paul@nas:/home/paul/nfs.tar
nfs.tar                        2%   24MB  12.9MB/s   01:25 ETA
We are now done with this Pi for now, the SD card will be used later.
There are alternate instructions below for 'cloning' an existing Pi using rsync to preserve permissions which can be quicker if you want to clone direct to your server.
Enable Network Boot
These steps enable USB Boot Mode (which includes PXE) on the Pi.
Step 1: Raspbian Lite SD Card
Either by repeating Step 1 above, or just re-using the card as left by the previous section, boot the Pi again.
Step 2: Boot Config
We must enable USB Boot Mode (which also supports PXE).
Append program_usb_boot_mode=1 to /boot/config.txt:
echo program_usb_boot_mode=1 | sudo tee -a /boot/config.txt
Which can be verified with tail /boot/config.txt:
pi@raspberrypi:~ $ tail /boot/config.txt
#dtparam=spi=on

# Uncomment this to enable the lirc-rpi module
#dtoverlay=lirc-rpi

# Additional overlays and parameters are documented /boot/overlays/README

# Enable audio (loads snd_bcm2835)
dtparam=audio=on
program_usb_boot_mode=1
Then reboot:
sudo reboot
Once the Pi is back up, check the OTP has been programmed correctly with vcgencmd otp_dump | grep 17::
pi@raspberrypi:~ $ vcgencmd otp_dump | grep 17:
17:3020000a
If the output ends with 3020000a then it has worked.
Once more we are done with the Pi and SD Card for now, you can revert the /boot/config.txt change if you wish to keep using the card for other things, the rest of the /boot partition on the SD card will still be needed later.
Actually Network Booting the Pi
In this set of steps we make the required server-side changes to allow it to boot.
Step 1: DHCP
Your local DHCP server needs to be able to send a couple of specific DHCP options.
My server is already running the ISC DHCP Server which can be installed with sudo apt-get install isc-dhcp-server.
Beforehand my DHCP configuration (/etc/dhcp/dhcpd.conf) served up IPs in the range 192.168.1.100-200 along with a specific local DNS suffix, name servers and the gateway, plus a number of IP reservations (not included below):
The address of the next-server directive has to be added: next-server 192.168.1.50;, as well as the tftp-server-name: option tftp-server-name "192.168.1.50";.
I have not come across the need for the tftp-server-name entry before when PXE booting standard (x86/x64) computers/servers.
This thread helped narrow down some of the required config changes for isc-dhcp-server.
After any changes restart the service:
sudo service isc-dhcp-server restart
DHCP activity can be viewed either by tailing syslog tail -f /var/log/syslog | grep dhcpd:
-> % tail -f /var/log/syslog | grep dhcpd
Mar  2 21:48:17 nas dhcpd[825]: DHCPDISCOVER from b8:27:eb:1b:3c:41 via em1
Mar  2 21:48:17 nas dhcpd[825]: DHCPOFFER on 192.168.1.58 to b8:27:eb:1b:3c:41 via em1
Mar  2 21:48:27 nas dhcpd[825]: DHCPDISCOVER from b8:27:eb:1b:3c:41 via em1
Mar  2 21:48:27 nas dhcpd[825]: DHCPOFFER on 192.168.1.58 to b8:27:eb:1b:3c:41 via em1
Or using tcpdump: sudo tcpdump -i em1 port bootpc
-> % sudo tcpdump -i em1 port bootpc
21:48:17.817689 IP 0.0.0.0.bootpc > 255.255.255.255.bootps: BOOTP/DHCP, Request from b8:27:eb:1b:3c:41 (oui Unknown), length 320
21:48:17.818171 IP nas.home.ridgway.io.bootps > 192.168.1.58.bootpc: BOOTP/DHCP, Reply, length 300
21:48:27.207000 IP 0.0.0.0.bootpc > 255.255.255.255.bootps: BOOTP/DHCP, Request from b8:27:eb:1b:3c:41 (oui Unknown), length 320
21:48:27.207371 IP nas.home.ridgway.io.bootps > 192.168.1.58.bootpc: BOOTP/DHCP, Reply, length 300
When the Pi is powered on after USB Boot Mode is enabled you can see it looking for an IP.
Step 2: TFTP
Install the TFTP service (which works through xinetd):
sudo apt-get install -y tftpd
Create a tftpd configuration file /etc/xinetd.d/tftp containing:
And create the /tftpboot folder specified above:
sudo mkdir /tftpboot
Then finally restart xinetd:
sudo service xinetd restart
To view activity from the TFTP server tail syslog with tail -f /var/log/syslog | grep tftpd :
Verify connectivity and logging from another host:
Client:
paul@box [21:54:00] [~]
-> % tftp 192.168.1.50
tftp> get test
Error code 1: File not found
tftp>
Server:
paul@nas [21:53:48] [~]
-> % tail -f /var/log/syslog | grep tftpd
Mar  2 21:54:04 nas tftpd[1800]: tftpd: trying to get file: test
Mar  2 21:54:04 nas tftpd[1800]: tftpd: serving file from /tftpboot
Now when the Pi is started after the DHCP entries, syslog should show some TFTP activity:
tftpd: trying to get file: bootsig.bin
tftpd: serving file from /tftpboot
Note: The log does not indicate failure due to this file not yet existing.
Copy all the files from the /boot partition of the SD card to the /tftpboot folder. If the Pi Firmware was updated as detailed above then it should be fine, however if not the latest bootcode.bin from GitHub is required.
eg:
paul@box [10:21:09] [/media/paul/boot]
-> % 7z a boot.7z /media/paul/boot/*
paul@box [10:35:39] [/media/paul/boot]
-> % scp boot.7z nas:
paul@nas [10:21:30] [~/boot]
-> % 7z x ../boot.7z
paul@nas [10:21:16] [~/boot]
-> % sudo mv * /tftpboot
Note: As noted by a reader, linking the TFTP root to the boot folder in the NFS tree allows the firmware to be updated. Linking or copying the contents of boot to NFS also allows I2C and SPI to work because the overlays in /boot are available to the OS.
Warning: If other files from GitHub (possibly the start/fixup elf files) are used the Pi will NOT be able to see all available resources such as RAM.
The logs show the files requested, so some clean-up can be done if desired.
tftpd: trying to get file: bootcode.bin
trying to get file: bootsig.bin
tftpd: trying to get file: ea1b3c41/start.elf
tftpd: trying to get file: autoboot.txt
tftpd: trying to get file: config.txt
tftpd: trying to get file: recovery.elf
tftpd: trying to get file: start.elf
tftpd: trying to get file: fixup.dat
tftpd: trying to get file: recovery.elf
tftpd: trying to get file: config.txt
tftpd: trying to get file: dt-blob.bin
tftpd: trying to get file: recovery.elf
tftpd: trying to get file: config.txt
tftpd: trying to get file: bootcfg.txt
tftpd: trying to get file: cmdline.txt
tftpd: trying to get file: recovery8.img
tftpd: trying to get file: recovery8-32.img
tftpd: trying to get file: recovery7.img
tftpd: trying to get file: recovery.img
tftpd: trying to get file: kernel8.img
tftpd: trying to get file: kernel8-32.img
tftpd: trying to get file: kernel7.img
tftpd: trying to get file: armstub8.bin
tftpd: trying to get file: armstub8-32.bin
tftpd: trying to get file: armstub7.bin
tftpd: trying to get file: armstub.bin
tftpd: trying to get file: kernel7.img
tftpd: trying to get file: bcm2710-rpi-3-b.dtb
tftpd: trying to get file: overlays/rpi-ft5406.dtbo
tftpd: trying to get file: overlays/rpi-backlight.dtbo
tftpd: trying to get file: config.txt
All being well when the PI starts it will first show the usual gradient screen:

And then appear to get stuck waiting for the SD card:
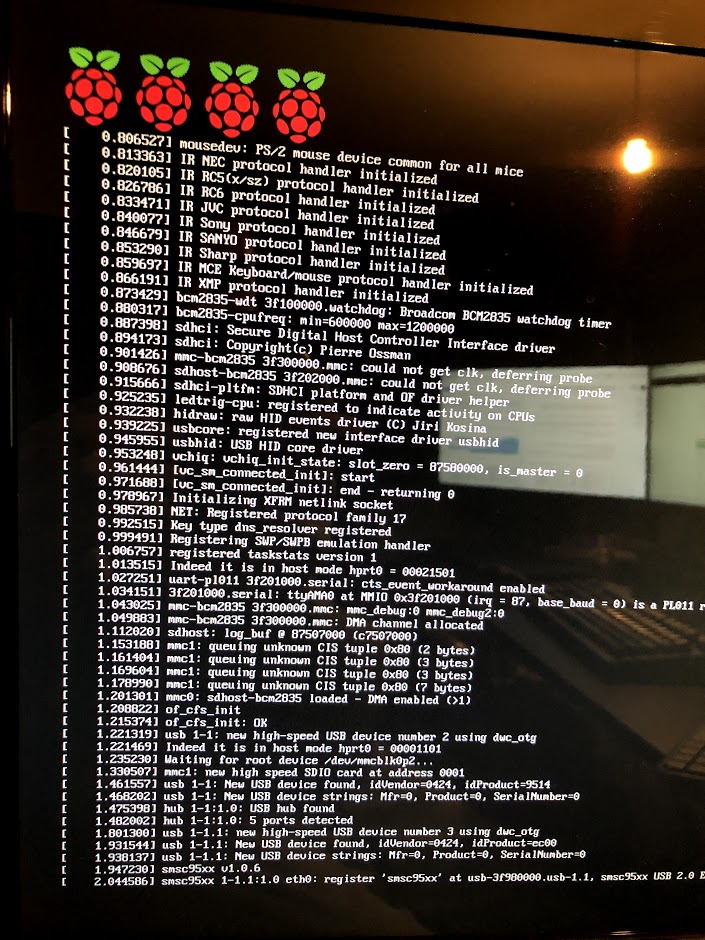
If any of the required files are missing, DHCP is not configured correctly or it cannot reach TFTP in my experience you won't even get the gradient screen.
Step 3: NFS
Install NFS Server:
sudo apt-get install -y nfs-kernel-server
Extract the tar archive from the steps above.
Again, to preserve permissions sudo and --same-owner are important:
sudo tar --same-owner -xvf nfs.tar
And move the nfs folder to root:
sudo mv nfs /
And then set up the NFS export, restarting NFS after and ensuring it is enabled:
echo "/nfs/client1 *(rw,sync,no_subtree_check,no_root_squash)" | sudo tee -a /etc/exports
sudo systemctl enable rpcbind
sudo systemctl restart rpcbind
sudo systemctl enable nfs-kernel-server
sudo systemctl restart nfs-kernel-server
Now the Pi needs to be told to boot from the NFS Server, create/edit /tftpboot/cmdline.txt with the contents:
selinux=0 dwc_otg.lpm_enable=0 console=tty1 rootwait rw nfsroot=192.168.1.50:/nfs/client1,v3 ip=dhcp root=/dev/nfs elevator=deadline
This can be copied and then edited from the boot partition of the SD card too.
Finally, remove all other entries from the fstab file /nfs/client1/etc/fstab so that it only contains the proc entry:
proc /proc proc defaults 0 0
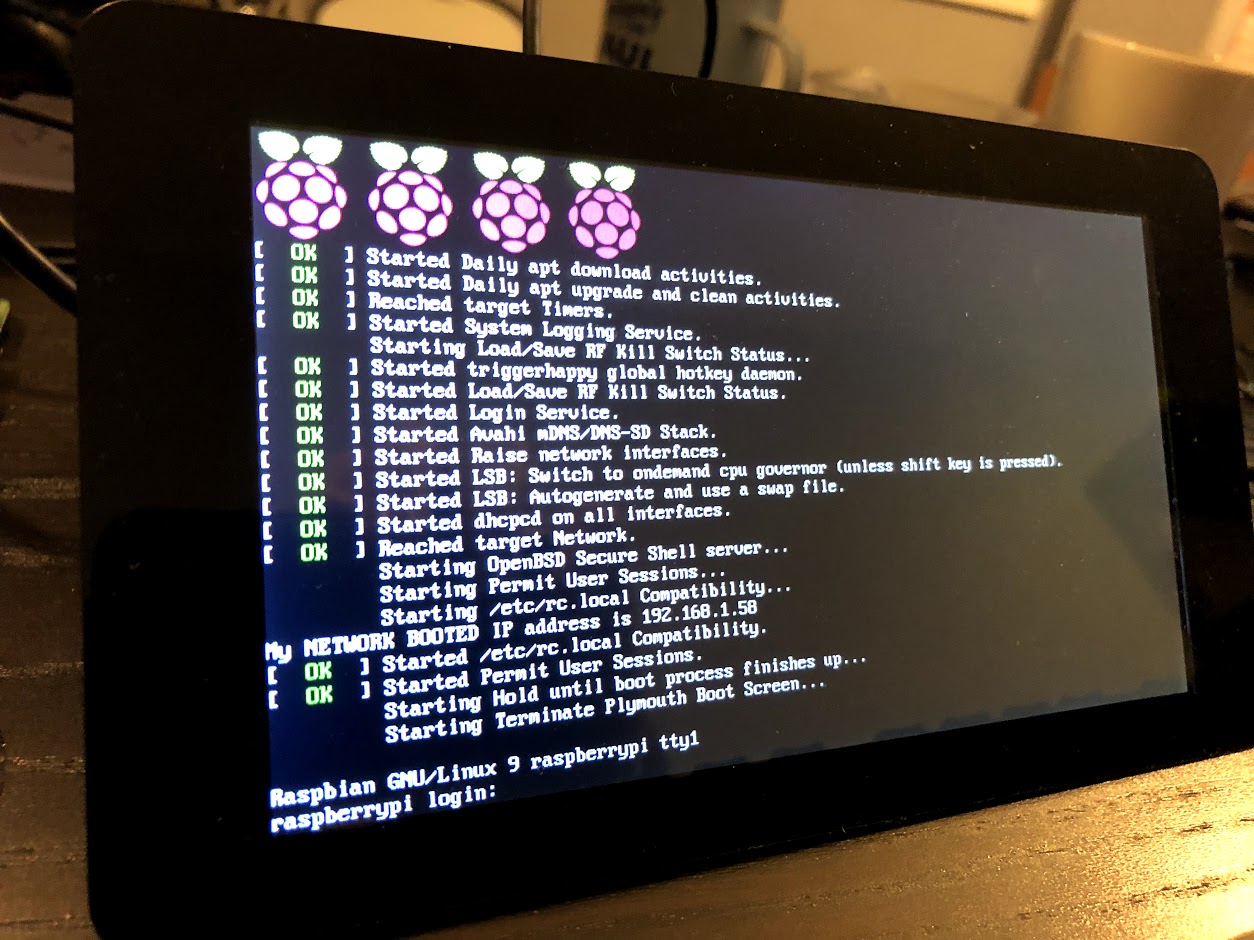
The Pi should now boot fully.
You can edit /nfs/client1/etc/rc.local to make it clear the Pi has network booted:
#!/bin/sh -e
if [ "$_IP" ]; then
  printf "My NETWORK BOOTED IP address is %s\n" "$_IP"
fi

exit 0
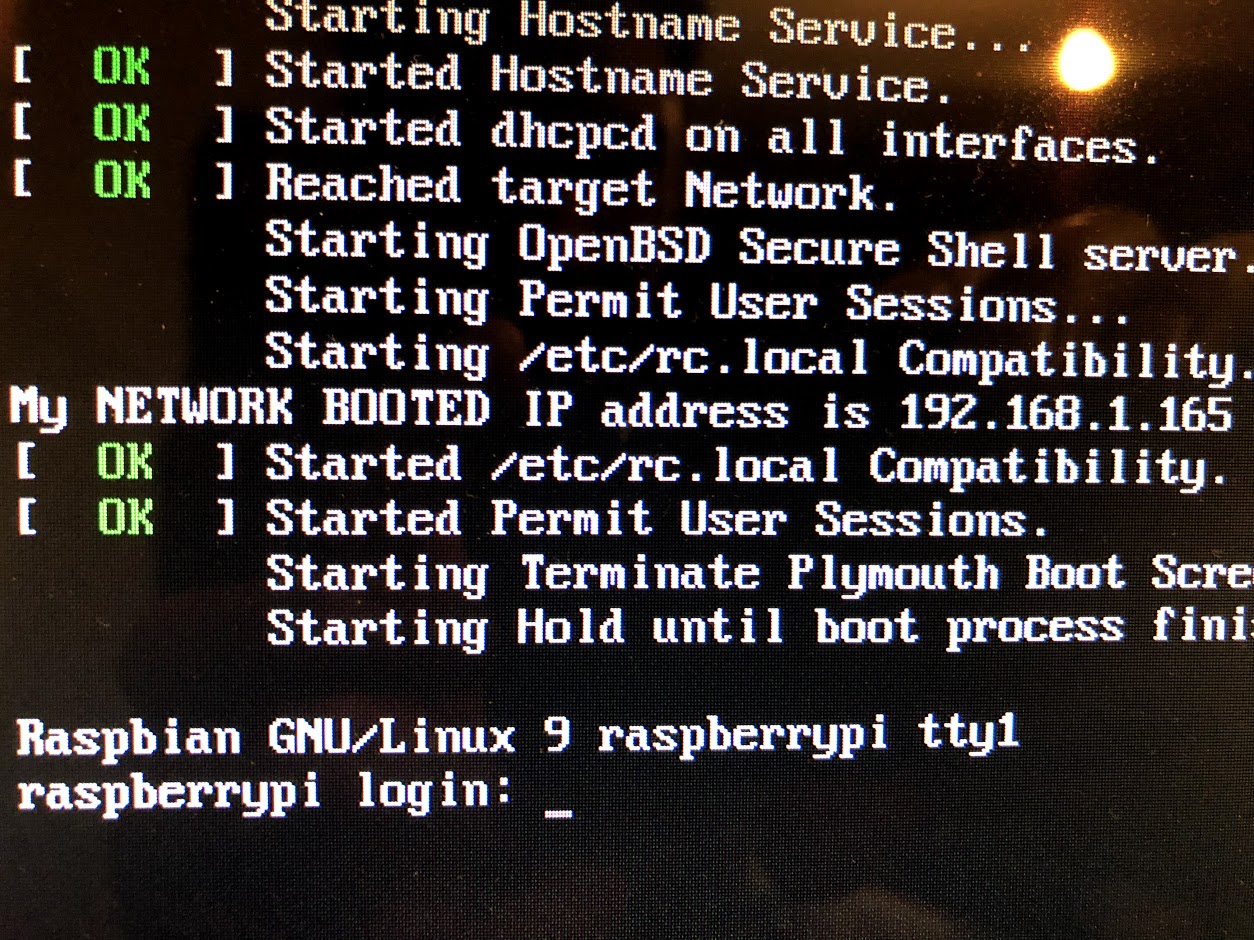
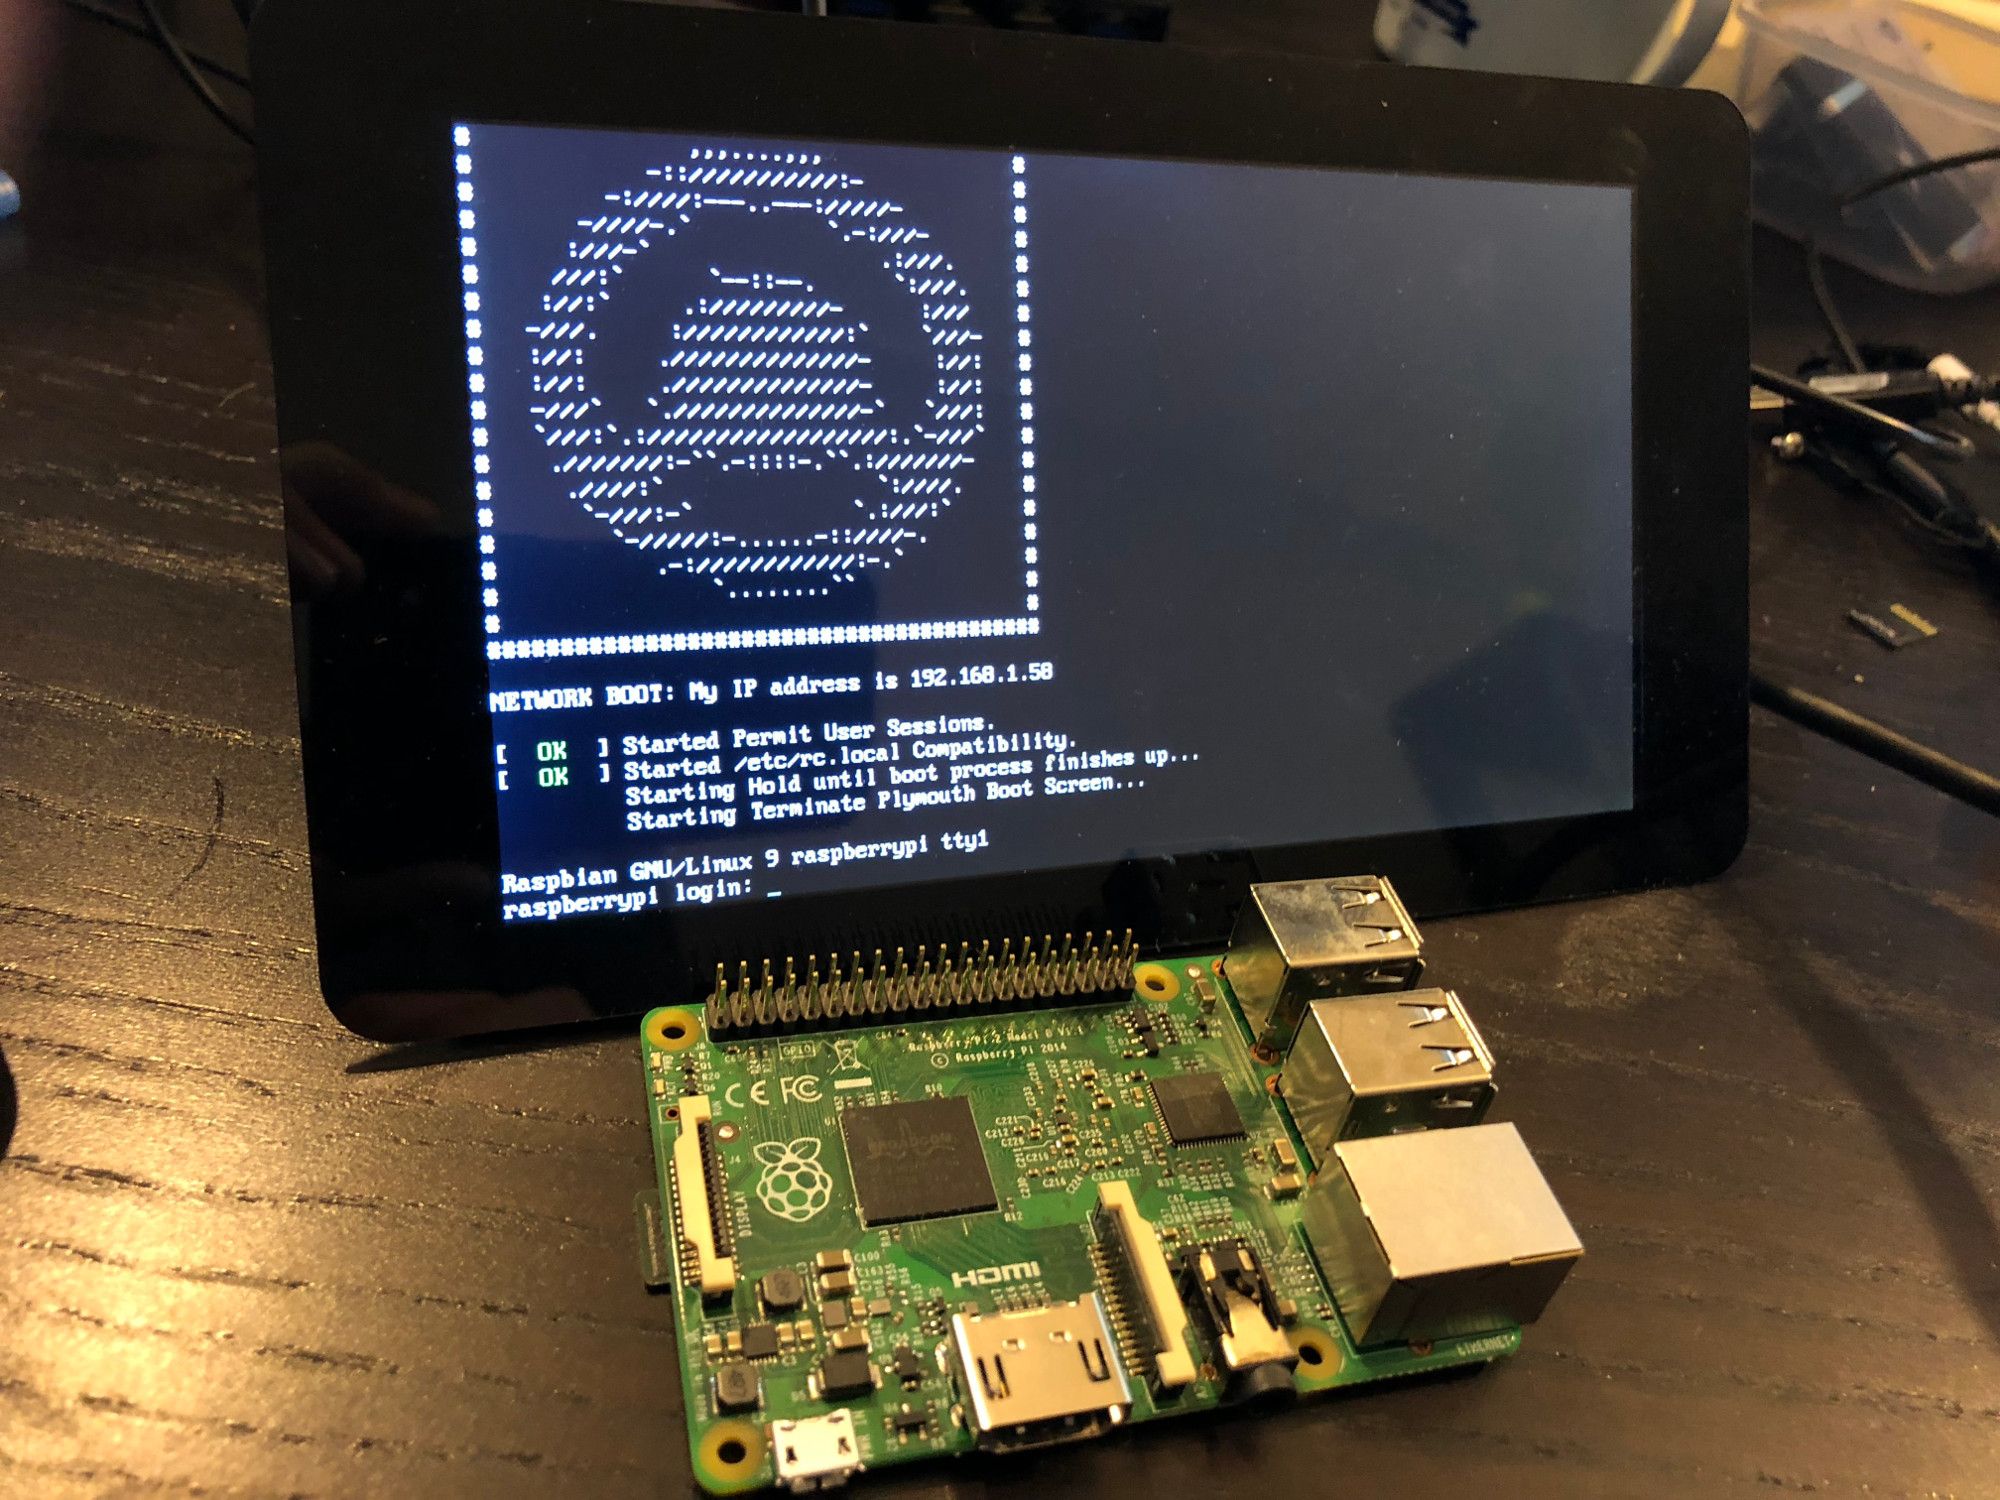
During the boot process the logs show the network and NFS configuration which can be useful to help debug issues (the lines from IP-Config and on):
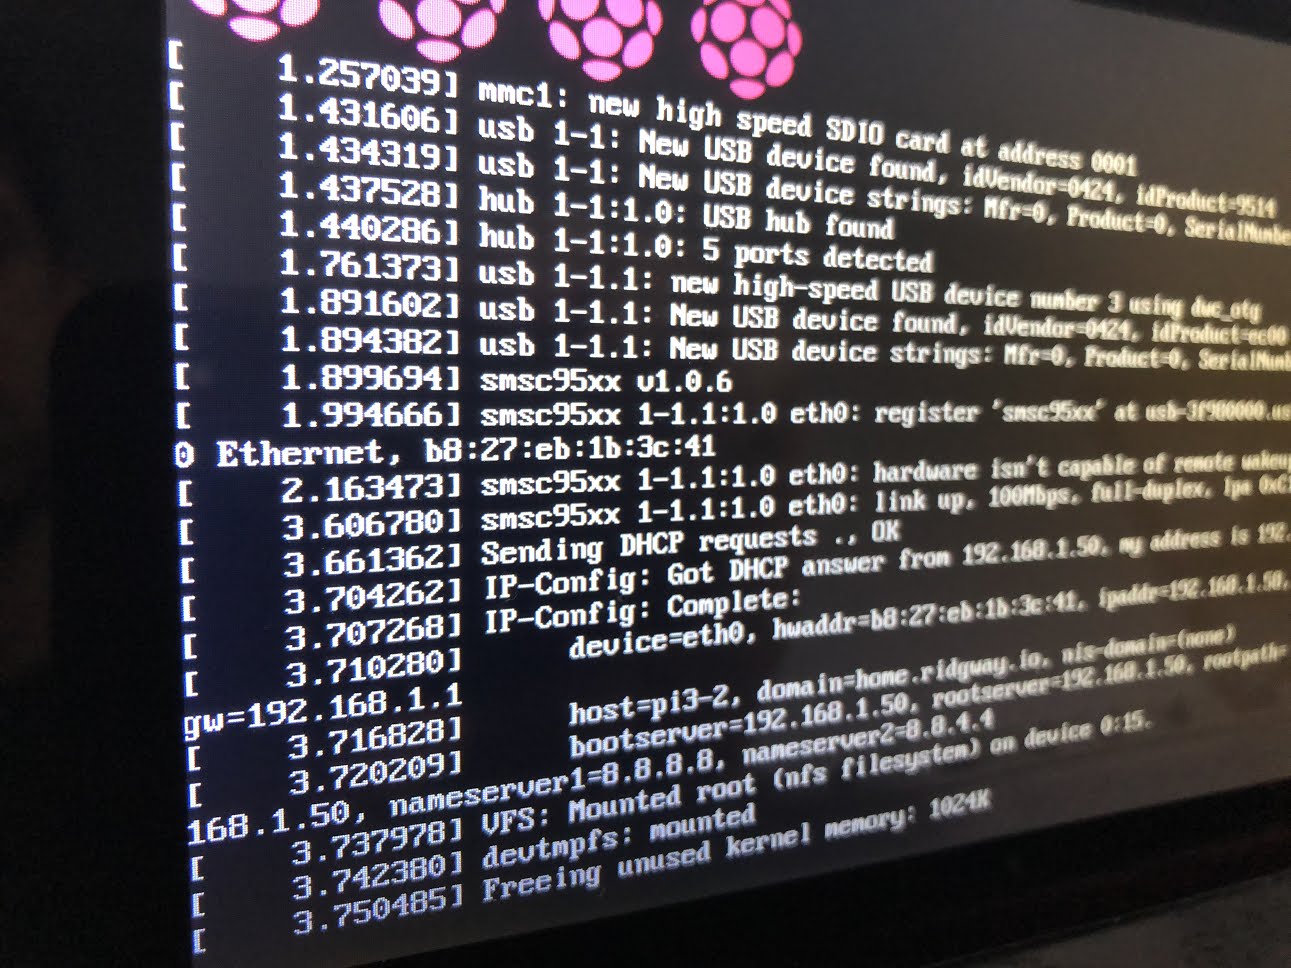
Step 4: Per Pi Configuration (Optional)
I have a TFT screen for the Pi which is upside down by default:
The fix is to add the following line to /boot/config.txt:
lcd_rotate=2
If I do that in /tftpboot/config.txt it will apply to all network booted Pis. Fortunately the Pi first checks a folder based on it's MAC address (serial number as stated here), as seen in last line below (copied from the boot sequence above):
Mar  2 22:21:19 nas tftpd[2579]: tftpd: trying to get file: bootcode.bin
Mar  2 22:21:19 nas tftpd[2581]: tftpd: trying to get file: bootsig.bin
Mar  2 22:21:19 nas tftpd[2583]: tftpd: trying to get file: ea1b3c41/start.elf
My PI has the MAC of ea:1b:3c:41 so a folder for it needs to be created:
sudo mkdir /tftpboot/ea1b3c41
If the PI finds start.elf there it will look for all other files there too, to save space they can be symlinked with sudo ln -s /tftpboot/* . which gives:
paul@nas [23:08:25] [/tftpboot/ea1b3c41]
-> % ls -alh
total 8.0K
drwxr-xr-x 2 root root 4.0K Mar  2 23:08 .
drwxr-xr-x 3 root root 4.0K Mar  2 23:06 ..
lrwxrwxrwx 1 root root   29 Mar  2 23:07 bcm2708-rpi-0-w.dtb -> /tftpboot/bcm2708-rpi-0-w.dtb
lrwxrwxrwx 1 root root   27 Mar  2 23:07 bcm2708-rpi-b.dtb -> /tftpboot/bcm2708-rpi-b.dtb
lrwxrwxrwx 1 root root   32 Mar  2 23:07 bcm2708-rpi-b-plus.dtb -> /tftpboot/bcm2708-rpi-b-plus.dtb
lrwxrwxrwx 1 root root   28 Mar  2 23:07 bcm2708-rpi-cm.dtb -> /tftpboot/bcm2708-rpi-cm.dtb
lrwxrwxrwx 1 root root   29 Mar  2 23:07 bcm2709-rpi-2-b.dtb -> /tftpboot/bcm2709-rpi-2-b.dtb
lrwxrwxrwx 1 root root   29 Mar  2 23:07 bcm2710-rpi-3-b.dtb -> /tftpboot/bcm2710-rpi-3-b.dtb
lrwxrwxrwx 1 root root   29 Mar  2 23:07 bcm2710-rpi-cm3.dtb -> /tftpboot/bcm2710-rpi-cm3.dtb
lrwxrwxrwx 1 root root   22 Mar  2 23:07 bootcode.bin -> /tftpboot/bootcode.bin
lrwxrwxrwx 1 root root   21 Mar  2 23:07 cmdline.txt -> /tftpboot/cmdline.txt
lrwxrwxrwx 1 root root   18 Mar  2 23:08 ea1b3c41 -> /tftpboot/ea1b3c41
lrwxrwxrwx 1 root root   21 Mar  2 23:07 kernel7.img -> /tftpboot/kernel7.img
lrwxrwxrwx 1 root root   20 Mar  2 23:07 kernel.img -> /tftpboot/kernel.img
lrwxrwxrwx 1 root root   22 Mar  2 23:07 start_cd.elf -> /tftpboot/start_cd.elf
lrwxrwxrwx 1 root root   22 Mar  2 23:07 start_db.elf -> /tftpboot/start_db.elf
lrwxrwxrwx 1 root root   19 Mar  2 23:07 start.elf -> /tftpboot/start.elf
lrwxrwxrwx 1 root root   21 Mar  2 23:07 start_x.elf -> /tftpboot/start_x.elf
We can move the newly created self referencing link:
sudo rm /tftpboot/ea1b3c41/ea1b3c41
Now when that Pi boots it will pull all subsequent files from that folder:
Mar  2 23:09:41 nas tftpd[5282]: tftpd: trying to get file: bootcode.bin
Mar  2 23:09:41 nas tftpd[5284]: tftpd: trying to get file: bootsig.bin
Mar  2 23:09:41 nas tftpd[5286]: tftpd: trying to get file: ea1b3c41/start.elf
Mar  2 23:09:41 nas tftpd[5288]: tftpd: trying to get file: ea1b3c41/autoboot.txt
Mar  2 23:09:41 nas tftpd[5290]: tftpd: trying to get file: ea1b3c41/config.
...
Now a modified config.txt can be added, either copied from /tftpboot and changed, or from the /boot partition of an SD Card:
paul@nas [23:10:12] [/tftpboot/ea1b3c41]
-> % ll
total 4.0K
lrwxrwxrwx 1 root root   29 Mar  2 23:07 bcm2708-rpi-0-w.dtb -> /tftpboot/bcm2708-rpi-0-w.dtb
lrwxrwxrwx 1 root root   27 Mar  2 23:07 bcm2708-rpi-b.dtb -> /tftpboot/bcm2708-rpi-b.dtb
lrwxrwxrwx 1 root root   32 Mar  2 23:07 bcm2708-rpi-b-plus.dtb -> /tftpboot/bcm2708-rpi-b-plus.dtb
lrwxrwxrwx 1 root root   28 Mar  2 23:07 bcm2708-rpi-cm.dtb -> /tftpboot/bcm2708-rpi-cm.dtb
lrwxrwxrwx 1 root root   29 Mar  2 23:07 bcm2709-rpi-2-b.dtb -> /tftpboot/bcm2709-rpi-2-b.dtb
lrwxrwxrwx 1 root root   29 Mar  2 23:07 bcm2710-rpi-3-b.dtb -> /tftpboot/bcm2710-rpi-3-b.dtb
lrwxrwxrwx 1 root root   29 Mar  2 23:07 bcm2710-rpi-cm3.dtb -> /tftpboot/bcm2710-rpi-cm3.dtb
lrwxrwxrwx 1 root root   22 Mar  2 23:07 bootcode.bin -> /tftpboot/bootcode.bin
lrwxrwxrwx 1 root root   21 Mar  2 23:07 cmdline.txt -> /tftpboot/cmdline.txt
-rw-r--r-- 1 root root 1.3K Mar  2 23:10 config.txt
lrwxrwxrwx 1 root root   21 Mar  2 23:07 kernel7.img -> /tftpboot/kernel7.img
lrwxrwxrwx 1 root root   20 Mar  2 23:07 kernel.img -> /tftpboot/kernel.img
lrwxrwxrwx 1 root root   22 Mar  2 23:07 start_cd.elf -> /tftpboot/start_cd.elf
lrwxrwxrwx 1 root root   22 Mar  2 23:07 start_db.elf -> /tftpboot/start_db.elf
lrwxrwxrwx 1 root root   19 Mar  2 23:07 start.elf -> /tftpboot/start.elf
lrwxrwxrwx 1 root root   21 Mar  2 23:07 start_x.elf -> /tftpboot/start_x.elf
If config.txt was already symbolically linked them remove that first.
Now it starts with the screen the right way up:
USB Boot Mode Enable / Check Card
The steps below describe how to create an SD card which will enable and verify USB Boot Mode (PXE) making it easier to configure a large number of Pi 3 devices in one go.
Step 1: Raspbian Lite SD Card
Either by repeating Step 1 above, or just re-using the card as left by the previous section, boot the Pi again.
In the following steps a few files are edited which can be done on a Pi or another machine that can edit the /boot and rootfs filesystems.
Step 2: Boot Config
As above, we must enable USB Boot Mode.
Append program_usb_boot_mode=1 to /boot/config.txt:
echo program_usb_boot_mode=1 | sudo tee -a /boot/config.txt
Which can be verified with tail /boot/config.txt:
pi@raspberrypi:~ $ tail /boot/config.txt
#dtparam=spi=on

# Uncomment this to enable the lirc-rpi module
#dtoverlay=lirc-rpi

# Additional overlays and parameters are documented /boot/overlays/README

# Enable audio (loads snd_bcm2835)
dtparam=audio=on
program_usb_boot_mode=1
Step 3: Check on boot
With a simple script the Pi can be checked on boot. The example below clears the screen to aid readability (not helpful for debugging boot issues) and then sleeps for a long time (24h), stopping the Pi from fully booting so the output is clearly seen, colour or other formatting could be added to make it more obvious!
Create /root/check-netboot.sh with the following contents:
#!/bin/bash

clear

CHECK=$(vcgencmd otp_dump | grep 17:)

if [[ "$CHECK" == "17:3020000a" ]]; then
  echo "Boot mode fine :) ($CHECK)"
else
  echo "!!! Boot mode failed, value: $CHECK"
fi

sleep 86400
Be sure to make it executable:
sudo chmod +x /root/check-netboot.sh
Edit /etc/rc.local to call check-netboot.sh:
#!/bin/sh -e

# Print the IP address
_IP=$(hostname -I) || true
if [ "$_IP" ]; then
  printf "My IP address is %s\n" "$_IP"
fi

/root/check-netboot.sh

exit 0
From this card each Pi 3 can be booted once which should enable USB boot mode (PXE) and confirm. The script could be updated to power off if successful with poweroff after the first echo in check-netboot.sh.
A few notes
Some notes have been pulled out into mini-guides:
Shared Install
All the devices have read-write access to the NFS file system in the configuration above, so any packages or changes installed on one are available to all.
Additionally any SSH access or hosts keys as well as the /etc/passwd file are all shared so these changes will also propagate.
While this might make it easier to make global changes (ie installing packages from apt) it is slow and I have seen errors at times, though these might have been permissions related before I found a solution to that, it seems best to make changes locally and re-clone the file system.
Touchscreen
Currently it appears the Raspberry Pi touchscreen does not get detected when network booted. Resolving this is still a work in progress...
Update (2019-04-06): I finally had time to try out atftp, which does appear to have solved the touchscreen detection issue.
Per Device Configuration
The steps above to enable per-device config.txt options can also be used to override cmdline.txt (removing the symlinked version first) and specify an alternative NFS path. /etc/exports would also need to be updated.
eg:
root@nas:/tftpboot/ea1b3c41# rm cmdline.txt
root@nas:/tftpboot/ea1b3c41# cp ../cmdline.txt .
root@nas:/tftpboot/ea1b3c41# vi cmdline.txt
cmdline.txt now contents (note client 2):
selinux=0 dwc_otg.lpm_enable=0 console=tty1 rootwait rw nfsroot=192.168.1.50:/nfs/client2,v3 ip=dhcp root=/dev/nfs elevator=deadline
/etc/exports contains:
# /etc/exports: the access control list for filesystems which may be exported
#		to NFS clients.  See exports(5).
#
# Example for NFSv2 and NFSv3:
# /srv/homes       hostname1(rw,sync,no_subtree_check) hostname2(ro,sync,no_subtree_check)
#
# Example for NFSv4:
# /srv/nfs4        gss/krb5i(rw,sync,fsid=0,crossmnt,no_subtree_check)
# /srv/nfs4/homes  gss/krb5i(rw,sync,no_subtree_check)
#
/nfs/client1 *(rw,sync,no_subtree_check,no_root_squash)
/nfs/client2 *(rw,sync,no_subtree_check,no_root_squash)
/nfs/client2 is a copy of /nfs/client1 with a modified /etc/rc.local to verify.
Cloning another Pi with rsync
Running this from the NFS server will clone as root on both sides which should preserve the permissions without the need to create or tar an /nfs folder on the device.
The first sudo allows rsync to set the right permissions and ownership on the local filesystem. The --rsync-path="sudo rsync" runs rsync as root on the Pi ensuring it has access to all files. With the default sudoers configuration it will not prompt for anything other than the pi user's SSH password.
sudo rsync -xa --progress --rsync-path="sudo rsync" --exclude '/var/swap' --stats pi@192.168.1.59:/ /nfs/client1
Remember to edit /etc/fstab in the NFS file system afterwards as well as removing /var/swap if it wasn't excluded.
A simple script to do this clone.sh:
#!/bin/bash
sudo rsync -xa --progress --rsync-path="sudo rsync" --exclude '/var/swap' --stats $1:/ $2
grep proc $2/etc/fstab > $2/etc/fstab.new
mv $2/etc/fstab.new $2/etc/fstab
Run as ./clone.sh pi@192.168.1.59 /nfs/clientX.
Permissions and Sudo
If not using rsync as above or tar with the specific permissions flags described earlier then after creating the NFS file system the permissions may be inherited from the extraction path or similar if the specific tar instructions above were not followed:
root@nas:/nfs/client1# ll
total 88
drwxr-xr-x 22 paul paul 4096 Mar  2 20:45 ./
drwxr-xr-x  4 paul paul 4096 Mar  3 09:53 ../
drwxr-xr-x  2 paul paul 4096 Mar  2 19:04 bin/
drwxr-xr-x  2 paul paul 4096 Jan  1  1970 boot/
drwxr-xr-x  3 paul paul 4096 Jan  1  1970 boot.bak/
drwxr-xr-x  2 paul paul 4096 Mar  2 20:39 dev/
drwxr-xr-x 83 paul paul 4096 Mar  3 09:59 etc/
drwxr-xr-x  3 paul paul 4096 Nov 29 01:22 home/
drwxr-xr-x 17 paul paul 4096 Mar  2 19:12 lib/
drwx------  2 paul paul 4096 Nov 29 02:35 lost+found/
drwxr-xr-x  2 paul paul 4096 Nov 29 01:06 media/
drwxr-xr-x  2 paul paul 4096 Nov 29 01:06 mnt/
drwxr-xr-x  3 paul paul 4096 Nov 29 01:22 opt/
dr-xr-xr-x  2 paul paul 4096 Jan  1  1970 proc/
drwx------  2 paul paul 4096 Mar  2 19:13 root/
drwxr-xr-x  2 paul paul 4096 Mar  2 20:44 run/
drwxr-xr-x  2 paul paul 4096 Mar  2 19:04 sbin/
drwxr-xr-x  2 paul paul 4096 Nov 29 01:06 srv/
dr-xr-xr-x  2 paul paul 4096 Jan  1  1970 sys/
drwxrwxrwt  8 root root 4096 Mar  3 09:56 tmp/
drwxr-xr-x 10 paul paul 4096 Nov 29 01:06 usr/
drwxr-xr-x 11 paul paul 4096 Mar  3 09:56 var/
To fix this give root ownership to all files except home, note the use of the UID and GID as they will not match the server entity names:
root@nas:/nfs/client1# sudo chown root:root . -Rf
root@nas:/nfs/client1# chown 1000:1000 home/pi -Rf
If trying to sudo on a network booted Pi and getting the following error:
sudo: /usr/bin/sudo must be owned by uid 0 and have the setuid bit set
Then ensure the setuid bit is set:
root@nas:/nfs/client1# chmod u+s usr/bin/sudo
Permissions can be verified against the local Ubuntu install:
root@nas:/nfs/client1# ls -alh /usr/bin/sudo
-rwsr-xr-x 1 root root 134K Jul  4  2017 /usr/bin/sudo
root@nas:/nfs/client1# ls -alh usr/bin/sudo
-rwsr-xr-x 1 root root 133K Jun  5  2017 usr/bin/sudo
This is still not perfect so it is strongly advised to use rsync or tar as described previously.
Backups
The NFS root can easily be backed-up:
root@nas:/nfs# cp client1 backup -Rf
It would be wise to back it up before making any material configuration or package changes, just in-case.
Boot Failures
If the Pi is not requesting anything from TFTP it could be a DHCP configuration problem, or a TFTP access problem.
If you see the Pi get little or no further than requesting bootcode.bin then it is possible the wrong version of the files are in the tftp folder, ensure the next branch versions are used:
Mar 2 23:11:31 nas tftpd[5385]: tftpd: trying to get file: bootcode.bin
If it gets further, but then hangs as shown further above it could be a NFS/filesystem access problem.
Beware TFTP File Caching
Not proven, however when debugging the misreported RAM issue I replaced my custom boot folder (with new symlinks) but the touchscreen Pi still appeared to pick up the old files as it was reporting lower RAM.
After an xinetd restart all was fine...
Performance
Installing and configuring packages etc is naturally going to be slower as the Pi only has 100Mbit Ethernet and the overheads of using a network-based file system.
For speed all config could be done on SD then copied over using the steps above.